Mammographically Guided Wire Localizations
by Elena Drews, MD, Mollie Rashid, MD, and Olivia Linden, MD.
The following guide is meant to serve as a general overview of stereotactic (mammography-guided) wire localization. Depending on institutional preferences and equipment used, there may be mild variations in the steps for the procedure.
Step 1: Pre-Procedure
Determine the best approach to target the lesion, typically via the shortest skin-to-target route.
Determine the number of wires desired for localization.
Determine if the localization will be performed with the patient in prone or upright position. The latter will be discussed below.
Arrange timing of procedure with surgical team; surgery is usually performed the same day to minimize risks of dislodgement and infection.
Discuss the risks, benefits, and alternatives to the procedure with the patient.
Obtain written and verbal consent from the patient.
Technologist brings the patient to the procedure room.
Step 2: Pre-Procedure Imaging
Radiologist performs time out and confirms patient identity, procedure, and side.
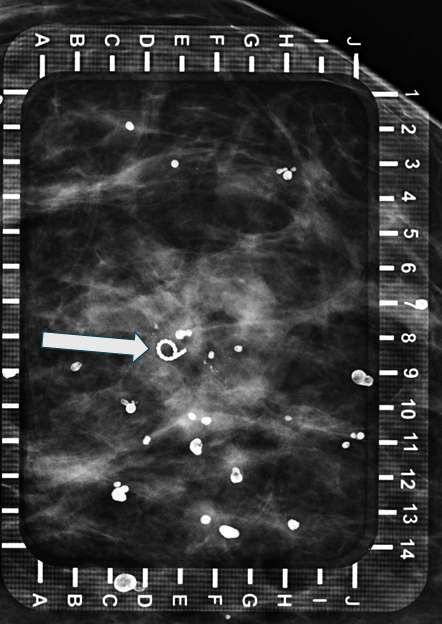
Technologist places breast in compression with fenestrated alphanumeric grid paddle. Technologist then takes a scout image to confirm appropriate grid placement overlying the target (Figure 1).
Radiologist confirms appropriate compression of breast tissue, appropriate visualization of biopsy target, and performs adjustments if necessary. Radiologist identifies target site to determine alphanumeric grid coordinates.

Step 3: Procedure Preparation
Prepare the site in the usual sterile fashion. Anesthetize with lidocaine.
Step 4: Insert needle(s) (plane 1)
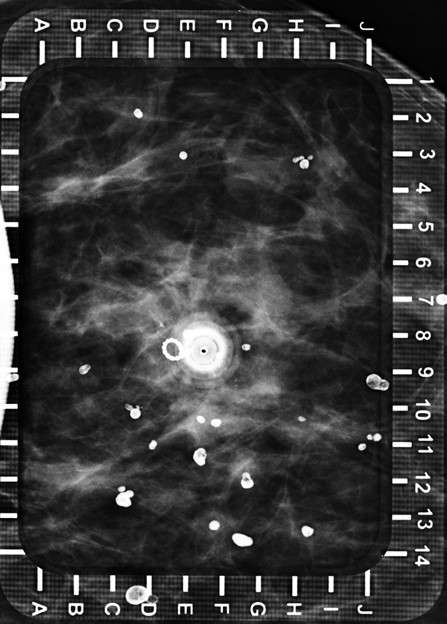
Radiologist advances the hollow needle perpendicular to the skin at the previously identified coordinates, to its full length or just above the detector on the far side of the breast.
Technologist obtains image to confirm location of needle over targeted lesion (within 0.5 cm) (Figure 2).

Step 5: Position needles and deploy wire (plane 2)
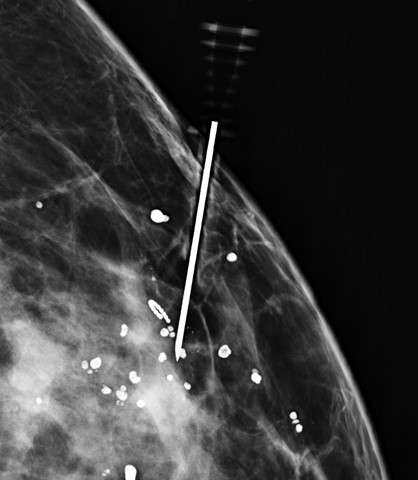
Technologist obtains orthogonal image of the breast (Figure 3).
Radiologist adjusts needle depth and then deploys wire, with tip between 0.5 – 1.0 cm deep to the lesion or as indicated based on surgeon preference. An image is taken to confirm wire tip location, then the needle(s) may be removed.

Step 6: Post-Placement
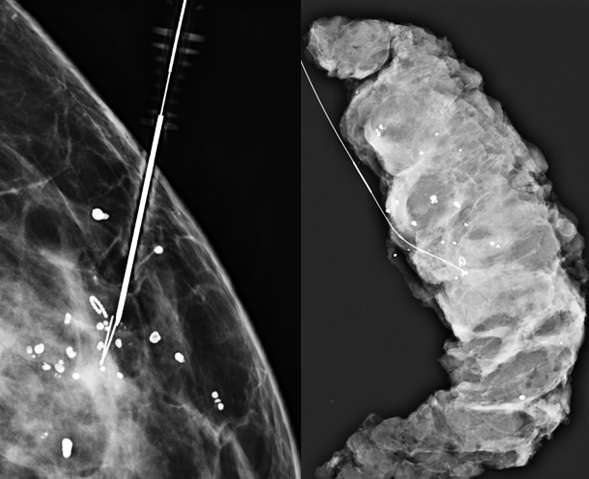
Technologist takes 2D or 3D mammogram with wire(s) in place (Figure 4).
Radiologist evaluates for adequate placement.
Patient proceeds to same-day surgery.
At surgery, tissue samples are packaged appropriately and sent for specimen radiography followed by histological analysis.

Reference:
Kalambo M, Dogan BE, Whitman GJ. "Step by Step: Planning a Needle Localization Procedure." Clin Imaging. 2020 Mar;60(1):100-108. DOI: 10.1016/j.clinimag.2019.12.007. Epub 2019 Dec 12. PMID: 31865213; PMCID: PMC8635082.